There are several options to integrate JavasScript components in Wisej applications. These can be components that are needed to cover some specific task, have a special appearance or functionality that you require or simply some component that you are already familiar with or have bought some commercial license for.
The first way to integrate components in Wisej is through Extensions
We have already created a growing list of ready to use Extensions, including Google Maps, various editors (see https://wisej.com/blog/editors-choice/) , Gauges, Charts, Barcode reader, Fonts, Icons, Calendar and many more.
Find the complete list here: https://wisej.com/extensions/
Extensions can be used very easily. Just download from our website and then (optionally) run the registry script to make them directly available in Visual Studios Toolbox.
Learn more about Extensions in our overview: http://s3.amazonaws.com/wisej/downloads/Extensions/Wisej-Extensions.pdf
You can also define and create your own Extensions and share them with your colleagues or the Wisej community.
Another more flexible way that is also the main topic fo this series of blog articles is our Widget Class.
It´s part of the core Wisej technology and can be easily configured.
There are 2 main properties, one is a packages collection where you can define the resources that are need to include the JavaScript component. Usually it´s a mix of JavaScript script files and CSS files.
You can either host them on your servers or link to a CDN that most vendors/authors of JavaScript offer.
The second property of the Wisej widget is called InitScript and here you define the startup code that is needed to initialize the JavaScript component. You can define default properties, wire events, have different code between design mode and runtime mode etc.
All these different options will be covered in more detail.
Hands on – Dev Express
I have selected 4 controls of the impressive list of DevExpress DevExtreme suite (https://js.devexpress.com/).
In the packages for each component I add the following references:
package1.Name = “jquery.js”;
package1.Source = “https://code.jquery.com/jquery-3.1.0.min.js”;
package2.Name = “jszip.js”;
package2.Source = “https://cdnjs.cloudflare.com/ajax/libs/jszip/3.1.3/jszip.min.js”;
package3.Name = “dxall.js”;
package3.Source = “https://cdn3.devexpress.com/jslib/16.2.6/js/dx.all.js”;
package4.Name = “dxspa.css”;
package4.Source = “https://cdn3.devexpress.com/jslib/16.2.6/css/dx.spa.css”;
package5.Name = “dxcommon.css”;
package5.Source = “https://cdn3.devexpress.com/jslib/16.2.6/css/dx.common.css”;
package6.Name = “dxlight.css”;
package6.Source = “https://cdn3.devexpress.com/jslib/16.2.6/css/dx.light.css”;
I am using names for the packages in case some other javascript components in my Wisej application use the same resources which is quite likely for the jquery part.
Wisej´s package manager takes care of loading the scripts in the correct defined order and loads each named script only once.
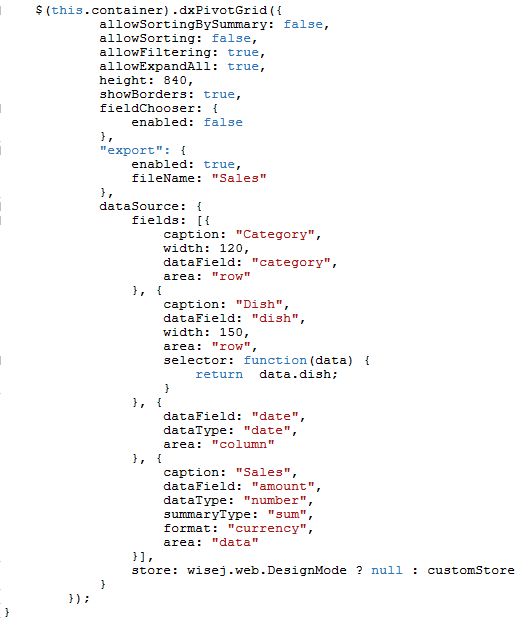
dxPivotGrid
DevExpress Pivot Grid is a quite powerful control that can be easily used in Wisej.
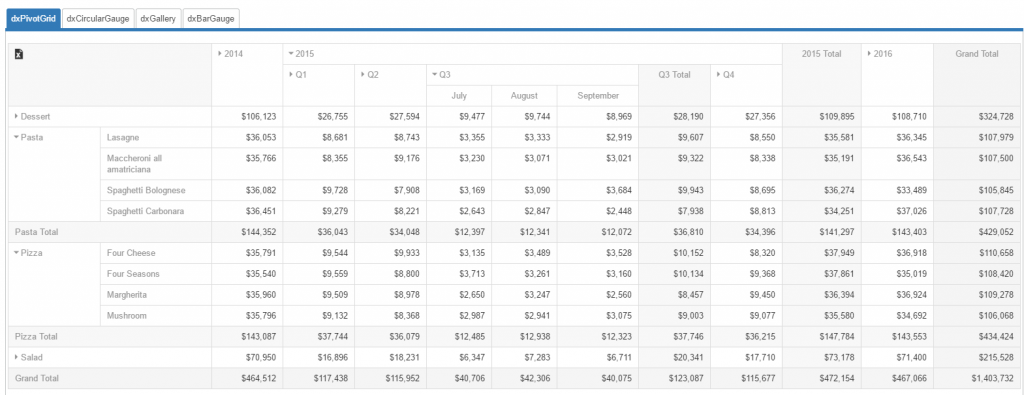
In my sample application I will feed it with data from the server side. I have created a simple function that generates random data but of course this data can come from database queries, or some other complex business logic. Here is the initialization script I have defined for the dxPivotGrid:
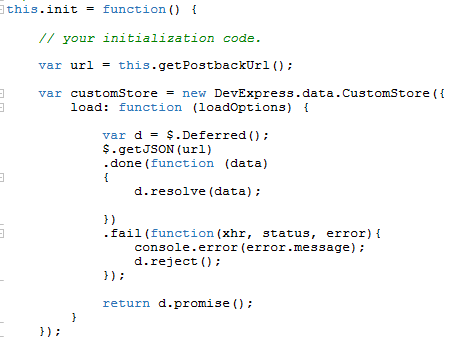
The DevExpress Custom Store is linked to my server code through the postback Url and will fire an event when data is needed.
The server implementation is as simple as this:

It just returns a json file with all the (raw) data needed for the Pivot Grid. All the sum calculations and grouping is done by the dxPivotGrid.
dxCircularGauge
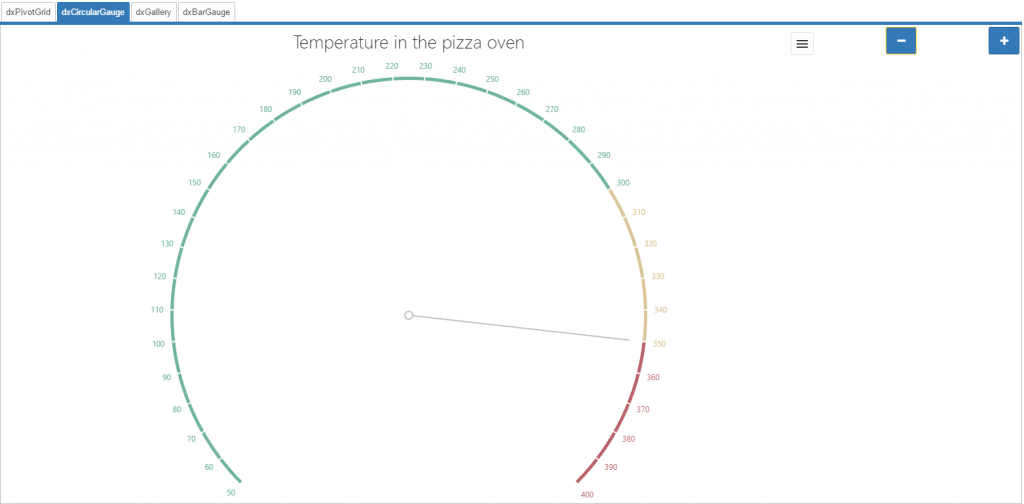
The initialization script contains a few definitions like min/max value, steps etc. and also attaches 2 event handlers.
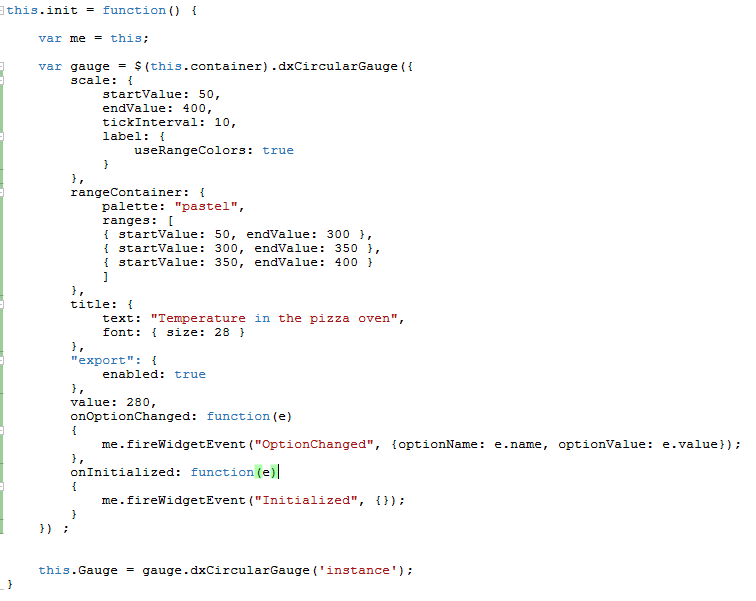
The 2 buttons are used to increase or decrease the temperature by 10 degrees. They are defined with Repeat = true so holding the button down keeps adding/removing until you release the mouse.
The 2 events are used to add some server side processing:
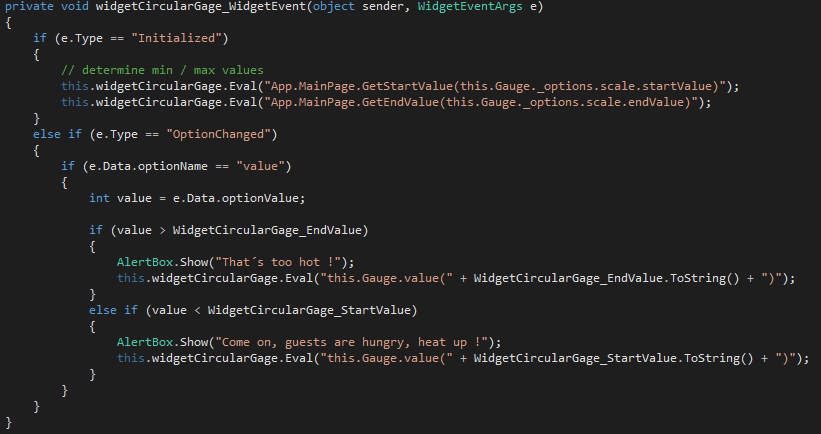
In case of the Initialized event I determine the start and end values that have been defined.
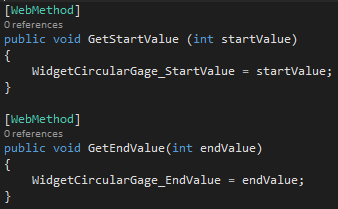
I´m using 2 WebMethods to bridge between client and server code.
When an option is changed I check if it´s the value option and then I compare against the start/end values.
When the limit is reached, an AlertBox is shown and the value is set to the limit.
As you can see, event data is passed with a dynamic object. In case of OptionChanged this data is transferred:
{optionName: e.name, optionValue: e.value}
I could have used similar code for the Initialized event but wanted to show the 2nd approach as well.
dxGallery
This is another nice control from DevExpress that can be used in Wisej very easily.

Please note the navigation links at the bottom. You can also swipe to navigate.
Again the initialization script that is needed is quite simple:
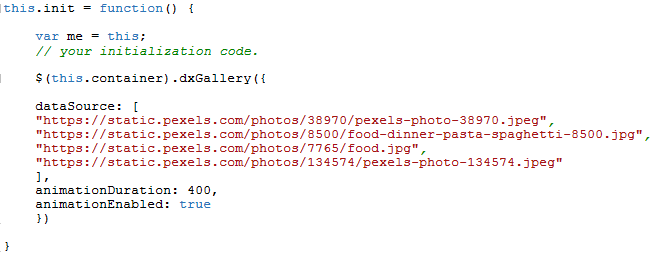
In this sample, the pictures are statically defined in the init script, but you could easily follow the same way I did with the Pivot Grid to supply that control with images queried by server code.
dxBarGauge
The last control I want to integrate into a Wisej app in the scope of this article is a Bar Gauge:
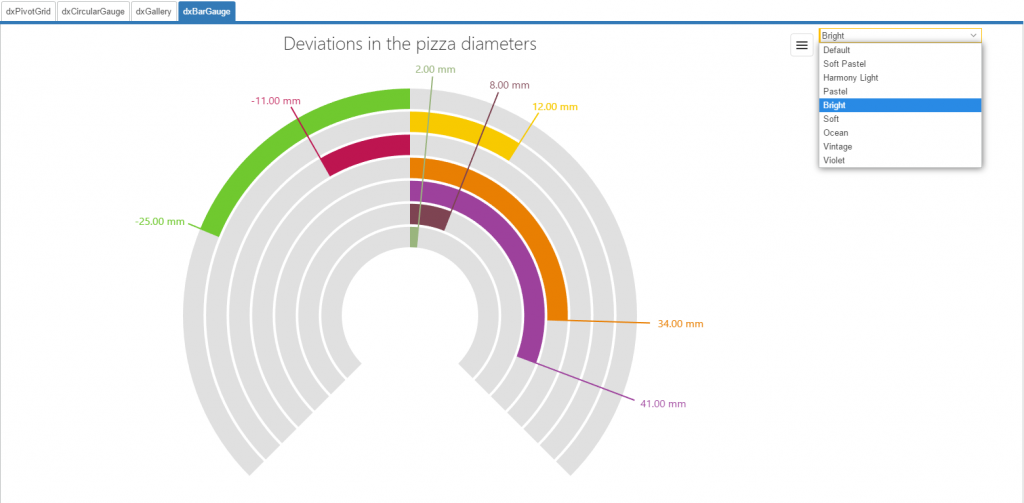
With the ComboBox at the right you can change the color palette that is used:

Conclusion:
Using DevExpress controls in Wisej is quite easy including server side data feeding and wiring events between client and server.
In the next articles of this Integration blog series we will integrate more JavaScript controls that are quite popular.